
There are two ways to listen to music on Discord: using music bots and connecting your Spotify account to your Discord account. Both are viable options and easy to do. Music bots will allow you to invite a bot into a voice channel and make it play music through commands. The Spotify connection, on the other hand, works on a user basis. Unlike music bots, which will make everyone in the voice channel listen to the same song; the Spotify connection allows you to select which user you want to listen to music with.
Let’s take a look at how you can use music bots in Discord - featuring FlaviBot!
Using Music Bots on Discord
People have been using music bots on Discord to listen to music for nearly a decade now. They are easy to set up and use, and most of them provide very acceptable quality of music. Of course, they have their own pros and cons - let’s take a look:
- Pros of music bots:
- Basic functionalities are mostly free
- Acceptable audio quality
- Easy to use, you can play music by using a single command
- Everyone in the voice channel can listen to it at the same time
- Most music bots have playlist features
- Cons of music bots:
- Advanced functionalities that will make your life easier are usually paywalled
- The connection of users can mess with the sync of the bot
- If you have a bad connection, you might hear the bot’s audio stuttering
- Not everyone in the voice channel might want to listen to the same song
Music bots are amazing but as with everything, they have their own advantages and holdbacks. Still, most music bots are a foolproof improvement to your Discord server.
What is FlaviBot and How do you Invite it to Your Discord Server?
FlaviBot is one of the most popular Discord bots, and it is used on more than 300.000 servers across Discord. The process of inviting it to your Discord server is just like inviting any other bot. Remember that to invite bots to your Discord server, you need to have the “Manage Server” permission. If you’re the owner of the server, you have all the permissions by default.
To invite the FlaviBot to your server, you have to find it through the built-in App Directory of Discord. It’s possible to find the invite link of the bot on the web, but using the App Directory is the safest way of inviting the bot - this applies to every single bot.
If you would like to learn more about safely adding bots to your server, check out the How to Safely Add a Bot to Your Discord Server section of our How to Use Discord Bots guide.
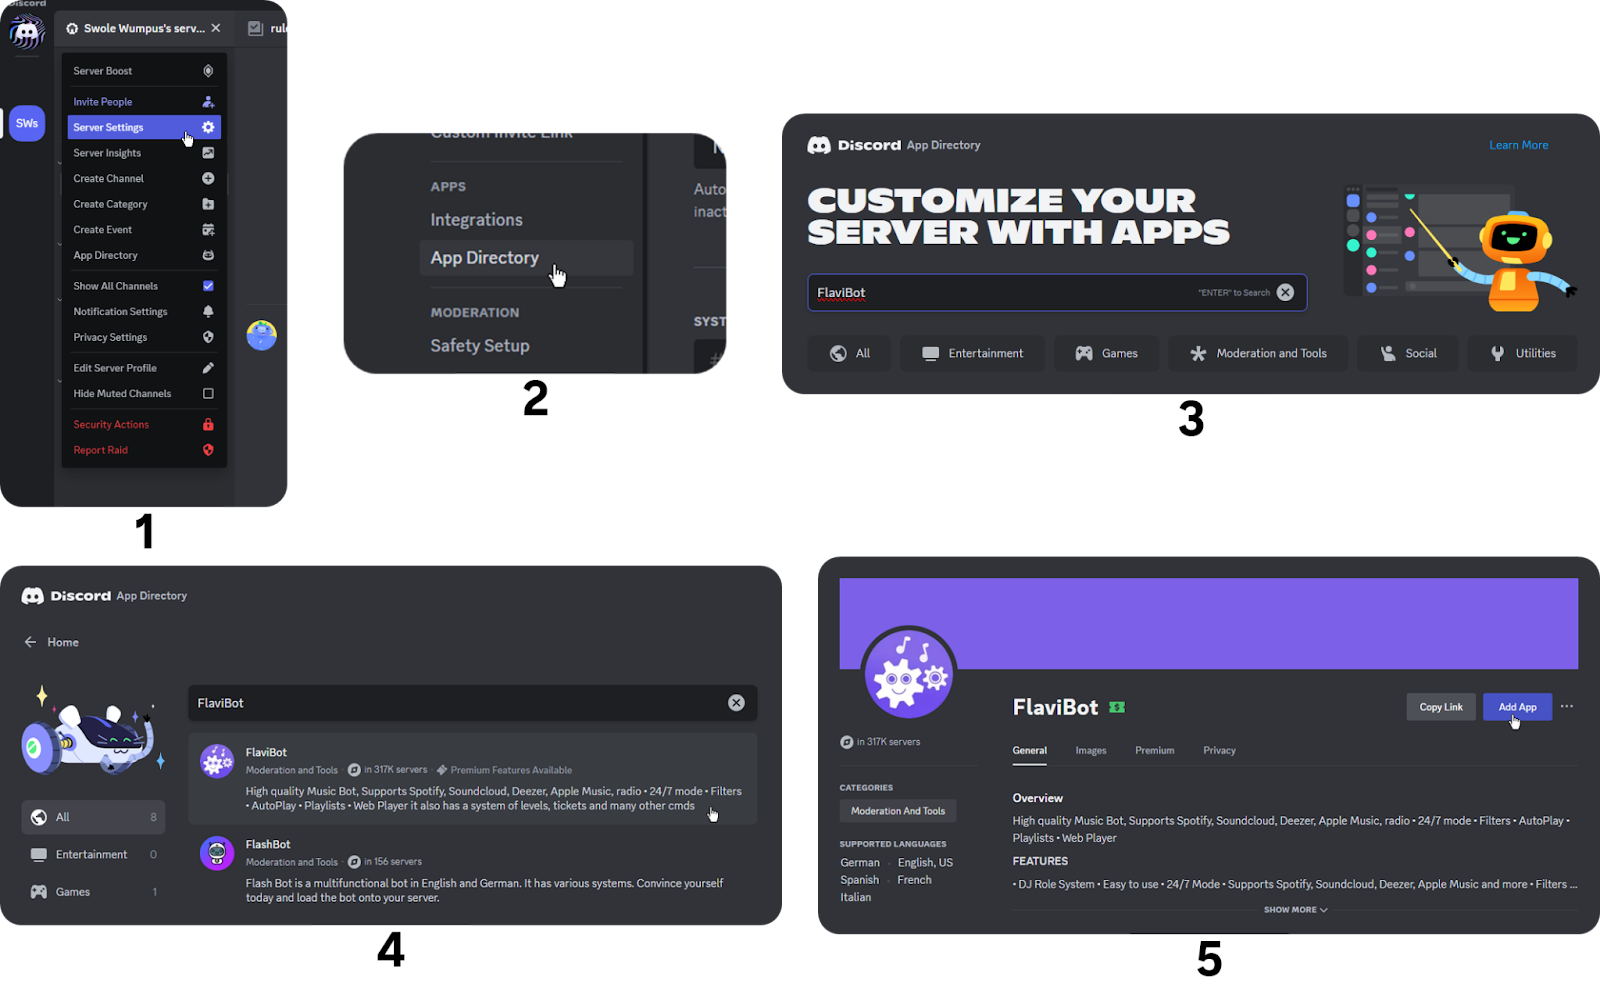
Let’s navigate to the App Directory and find the FlaviBot there:
- Click the server name at the top of your channel list to open the server context menu and select Server Settings.
- In the server settings, select the App Directory under the Apps section to open the App Directory.
- There, search for the FlaviBot.
- The first result you see should be the FlaviBot. Click on it to open its bot page.
- On the bot page, you can see all the relevant information the developer has provided. Clicking the Add App button to the right will start the process of adding the bot to your server.
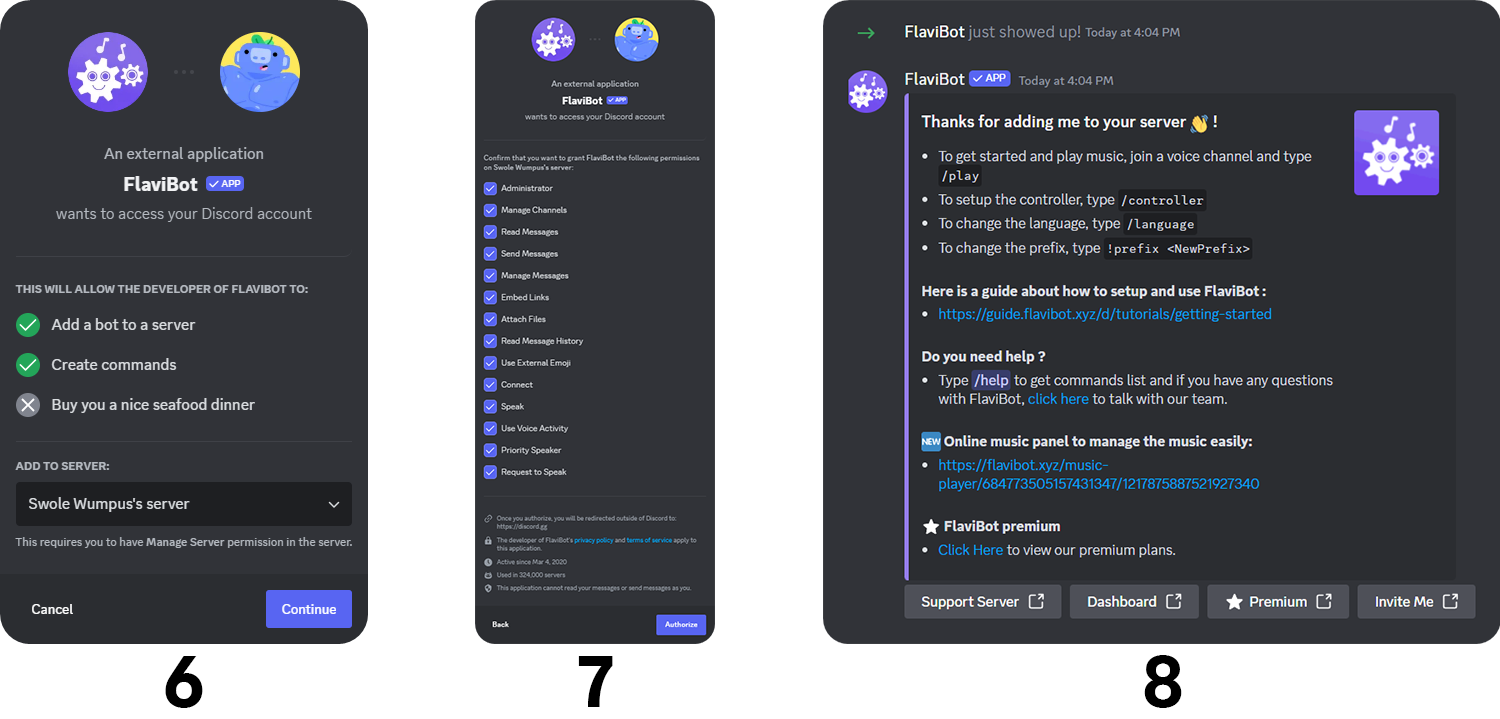
- Discord will prompt you to select which server you want to add your bot to. After selecting it through the dropdown menu at the bottom, click Continue.
- In this step, you will be able to see all the permissions the bot requests, and you can select which ones you want to grant. These will vary from bot to bot, but one thing you should always keep in mind is that granting unnecessary permissions to bots is a security risk.
For example, FlaviBot requests Administrator permission, which is the most dangerous permission you can grant to bots/users since it gives them control over every aspect of your server. The reason the bot requests this permission is to function correctly and avoid any permission or channel setup that might prevent the bot from functioning correctly.
There are no ill intentions, but we suggest you uncheck the Administrator permission on this list. If you don’t want to grant the bot the power to manage (delete, create, edit) channels, you can uncheck the Manage Channels permission as well. If the bot happens to not work due to you unchecking these permissions, it will let you know.
Once you’re satisfied with the permissions, click the Authorize button at the bottom right. - It’s done! You now have the FlaviBot in your Discord server.
Using FlaviBot to Play Music on Discord
Now that you’ve invited the FlaviBot to your server, you’ll see that it sent a message on your default channel (which can be adjusted in the Overview section of your Server Settings) as soon as it joined. In the message, you can see the basic things you need to know about the bot.
Let’s take a look at the commands of FlaviBot by using the /help command.
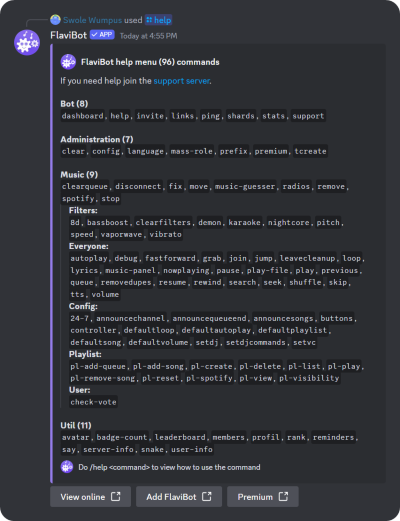
FlaviBot has over 100 available commands, but you'll use only a few to play music on your voice channel. Let’s see what those commands are and what they do:
- /play <song name, link, or file> - You should use this command while you’re in a voice channel. After you use the command, FlaviBot will join the voice channel you’re in and start playing the song you requested in the command. If you use it again while the bot is already playing a song, it will add it to its queue. This is the single command you’re going to use the most.
- /controller - FlaviBot has a lot of commands like previous, pause, resume, skip, shuffle, and more. Using the /controller command will trigger the bot to create a channel called “#flavi-controller” and send a dashboard in it. The dashboard will allow you to control the bot without using the commands. The bot needs the Manage Channels permission for this command to work as intended.
- /skip - This command will allow FlaviBot to skip the song it's currently playing.
- /pl-create - This command allows you to create a custom playlist, and you can play the playlist using the /pl-play command
- /loop <track | queue | disable> - This command will make FlaviBot loop the current song it’s playing. You can also use the /loop queue command to make the bot loop the song queue.
Using Spotify on Discord
As you might know, Discord allows you to connect other platforms to your Discord account so that you can display them in your Discord profile. Some of the connections also allow you to display what you’re doing on your profile as status - Spotify is one of them. The Spotify connection lets you display your Spotify account on your Discord profile, and it will display the music you’re listening to as your status. Of course, both depend on your settings - you can turn them off.
The Spotify connection also has three features that make listening to music with your friends much easier. These features play the song your friend is listening to on your Spotify, sync your Spotify to your friend’s so you can listen to what they’re listening to in sync, and invite others to sync.
Before jumping right into using them, let’s connect Spotify to your Discord account first.
How to Connect Spotify to Your Discord Account
Connecting your Spotify to your Discord account is very simple. First, you have to navigate to your user settings. Before making the connection, remember that once you connect your Spotify to your Discord account on any device, it will stay connected even if you switch devices. So, if you make the connection on your desktop, your Discord on your mobile device will be connected as well. Let’s take a look at the steps of connecting the two:
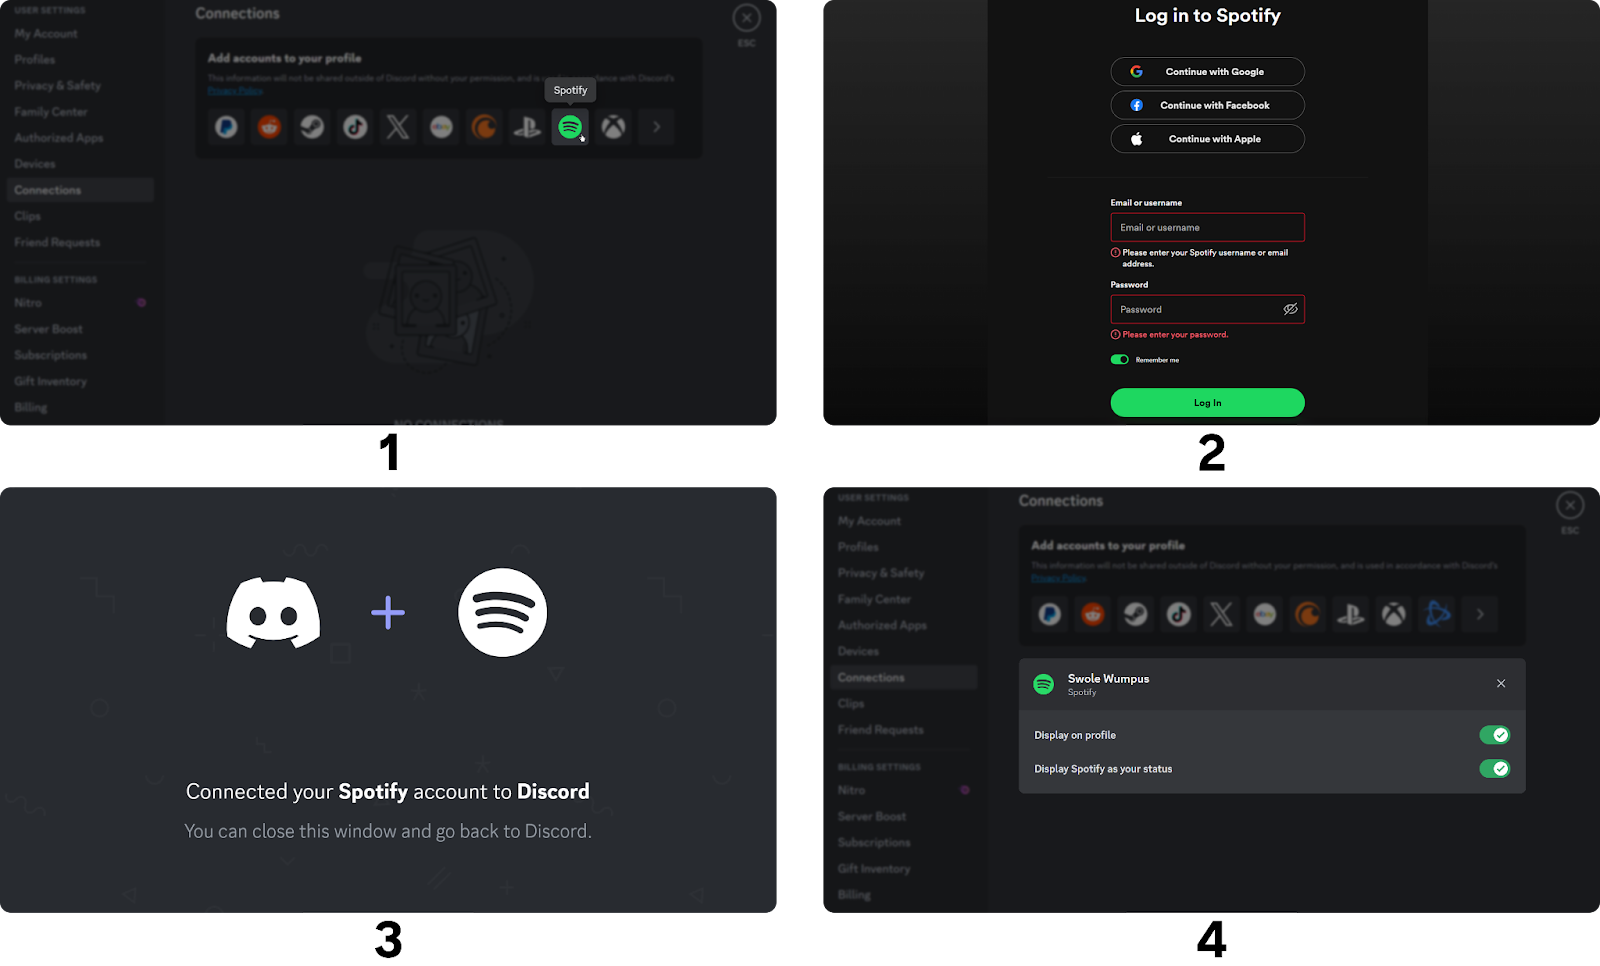
- Navigate to the Connections section of your User Settings and select the Spotify option from the connections list.
- You’ll be directed to the Spotify webpage on your browser and it will prompt you to sign into your Spotify account.
- Once you sign in, you’ll see that the two accounts are now connected. You can now close your browser.
- Once you go back to Discord, you’ll notice that the Spotify connection is now listed under the Connections section of your User Settings. There, you’ll see two toggle options: Display in profile and Display Spotify as your status. If the display in your profile is toggled on, everyone will be able to see your Spotify account in your Discord profile. One thing you might want to remember is that if you have your picture or your full name on your Spotify account, everyone will be able to see them. So, if you want to keep your details private, toggle off the display in the profile option. This won’t affect the other option (Display Spotify as your status), and it will still be visible.
If you want to connect your Spotify to your Discord account but you use a mobile device, you can still do it! Here are the steps to connect the two accounts on mobile:
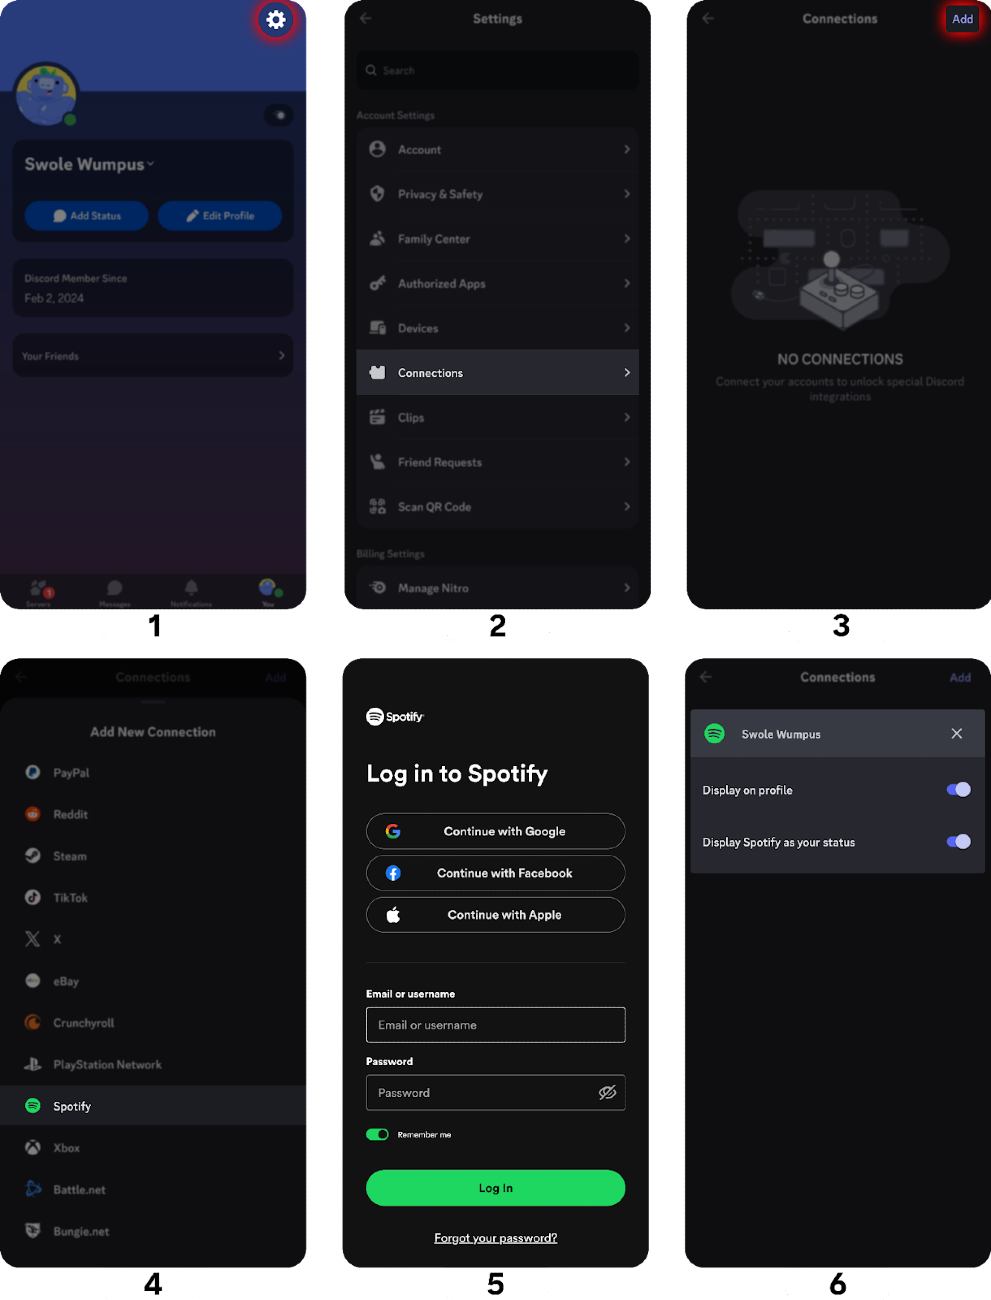
- In the You section of your Discord app, press the cogwheel icon at the top right to open your User Settings.
- There, press the Connections button to open the connection settings.
- You’ll see an Add button at the top right of the connection section. Pressing it will open a menu of all available connections.
- In the list, find Spotify and select it.
- Selecting Spotify will open your browser and prompt you to sign into your Spotify account.
- Once you sign into your Spotify account, you’ll be directed back to Discord, and you’ll notice that the Spotify connection can now be seen. It has two toggle options: Display in profile and Display Spotify as your status. If the display in your profile is toggled on, everyone will be able to see your Spotify account in your Discord profile. One thing you might want to remember is that if you have your picture or your full name on your Spotify account, everyone will be able to see them. So, if you want to keep your details private, toggle off the display in profile option. This won’t affect the other option (Display Spotify as your status), and it will still be visible.
Using the Spotify Connection on Discord
Now that you’ve connected your Spotify to your Discord account, it’s time to learn about its features and how to use them.
There are three unique features that the Spotify connection offers.
The first one of them is the ability to play the song your friend is listening to on Spotify. When you’re viewing a Discord user’s profile, if they have the connection and the Display Spotify as status option toggled on, you’ll see the song they’re listening to. Clicking the Play on Spotify button you see in their profile will trigger your Spotify to start playing the same song. This shouldn’t be confused with sync listening.
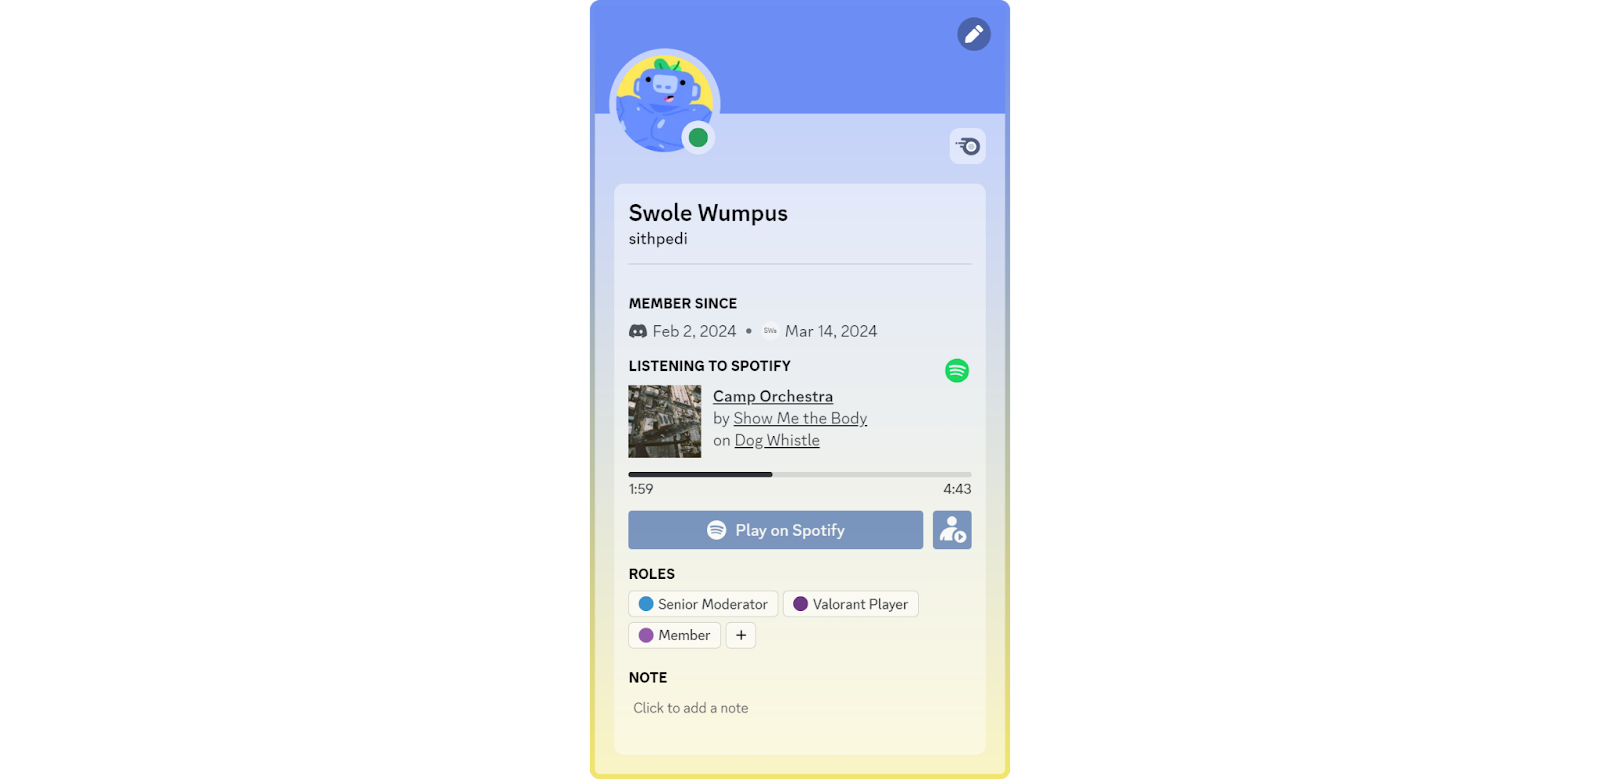
The other two features are related to sync listening. As you see in the image above, there’s also a person with a play button icon next to the Play on Spotify button. Clicking it will sync your Spotify to the person you’re viewing the profile of. If they switch to a different song or rewind the current one, your Spotify will do the same - listening party!
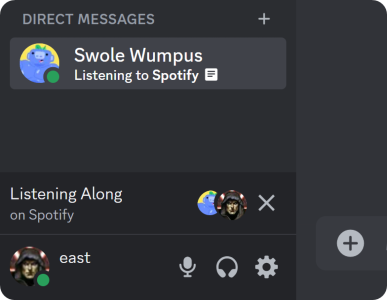
The last feature is inviting others to join your listening-along party and sync their Spotify to yours. This is basically a reverse version of syncing your music to others’ through their profiles. To send the invite, click on the attachment button in your message box, select the invite to Spotify option, and click send on the popup.
Running a Discord Server? Earn an Income With It!
Monetizing your Discord server has never been easier, and you can do it, too. Signing up to Whop and starting to sell access to your Discord server takes less than 10 minutes.
Start generating an income with Whop!


